无需nms,onnxruntime20行代码玩转RT-DETR
【前言】 RT-DETR是由百度近期推出的DETR-liked目标检测器,该检测器由HGNetv2、混合编码器和带有辅助预测头的Transformer编码器组成,整体结构如下所示。
 本文将采用RT-DETR两种不同风格的onnx格式,使用onnxruntime20行代码,无需nms操作即可实现简易部署推理.
一、原生onnx+ort推理方式
使用以下命令抽取出模型配置文件和模型参数文件:
python tools/export_model.py -c configs/rtdetr/rtdetr_hgnetv2_l_6x_coco.yml -o weights=https://bj.bcebos.com/v1/paddledet/models/rtdetr_hgnetv2_l_6x_coco.pdparams trt=True --output_dir=output_inference
paddle2onnx --model_dir=./output_inference/rtdetr_hgnetv2_l_6x_coco/ --model_filename model.pdmodel --params_filename model.pdiparams --opset_version 16 --save_file rtdetr_hgnetv2_l_6x_coco.onnx
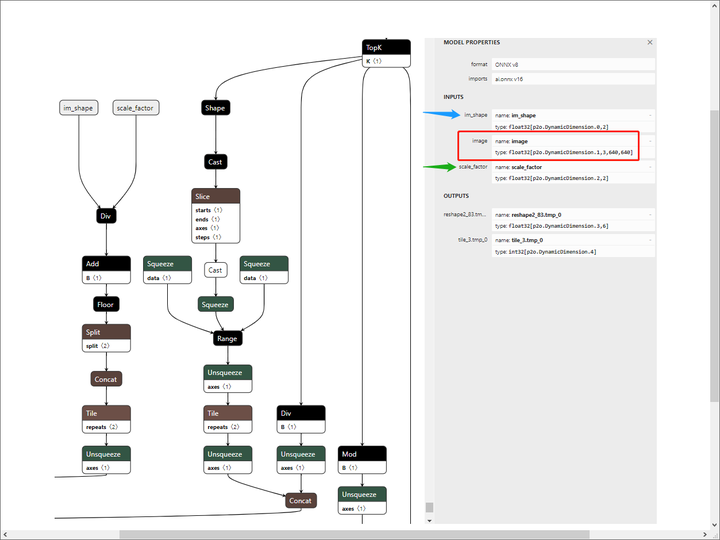 可以看到,除了图像的输入,还有另外两个输入头,其中,im_shape指原输入图像的尺寸,scale_factor指静态图尺度/原输入图像尺度,其实就是缩放的系数。
我们将batch_size固定为1,裁减掉不需要使用到的算子:
可以看到,除了图像的输入,还有另外两个输入头,其中,im_shape指原输入图像的尺寸,scale_factor指静态图尺度/原输入图像尺度,其实就是缩放的系数。
我们将batch_size固定为1,裁减掉不需要使用到的算子:
python -m paddle2onnx.optimize --input_model rtdetr_hgnetv2_l_6x_coco.onnx --output_model rtdetr_hgnetv2_l_6x_coco_sim.onnx --input_shape_dict "{'image':[1,3,640,640]}
import onnxruntime as rt
import cv2
import numpy as np
sess = rt.InferenceSession("/home/aistudio/PaddleDetection/rtdetr_hgnetv2_l_6x_coco_sim.onnx")
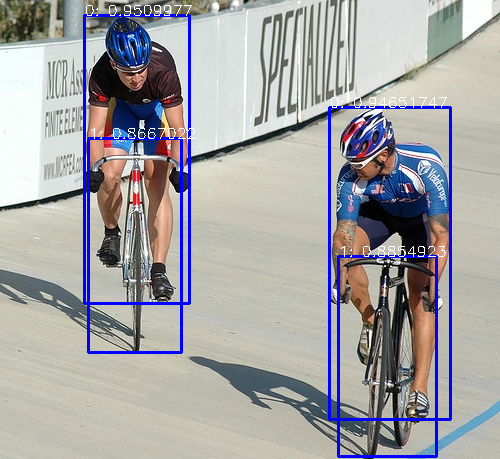
img = cv2.imread("../000283.jpg")
org_img = img
im_shape = np.array([[float(img.shape[0]), float(img.shape[1])]]).astype('float32')
img = cv2.resize(img, (640,640))
scale_factor = np.array([[float(640/img.shape[0]), float(640/img.shape[1])]]).astype('float32')
img = img.astype(np.float32) / 255.0
input_img = np.transpose(img, [2, 0, 1])
image = input_img[np.newaxis, :, :, :]
result = sess.run(["reshape2_83.tmp_0","tile_3.tmp_0"], {'im_shape': im_shape, 'image': image, 'scale_factor': scale_factor})
for value in result[0]:
if value[1] > 0.5:
cv2.rectangle(org_img, (int(value[2]), int(value[3])), (int(value[4]), int(value[5])), (255,0,0), 2)
cv2.putText(org_img, str(int(value[0]))+": "+str(value[1]), (int(value[2]), int(value[3])), cv2.FONT_HERSHEY_SIMPLEX, 0.5, (255,255,255), 1)
cv2.imwrite("../result.png", org_img)
二、野生onnx+ort推理方式
其实通过官方onnx模型的格式可以看出,官方已经将所有后处理步骤写入到模型中,此时不需要额外添加后处理代码,是一种比较省心的方式。 但对于有强迫症的笔者而言,对于三个输入头的模型实在是看着别扭,因此我更偏向于下面的这种推理方式。 同样是抽取官方模型,但此时我们将后处理的所有操作全部摘除,只保留原模型参数: 将模型的exclude_post_process设置为True,然后使用同样的代码进行转化:
python tools/export_model.py -c configs/rtdetr/rtdetr_hgnetv2_l_6x_coco.yml -o weights=https://bj.bcebos.com/v1/paddledet/models/rtdetr_hgnetv2_l_6x_coco.pdparams trt=True --output_dir=output_inference_sim
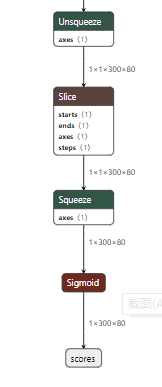
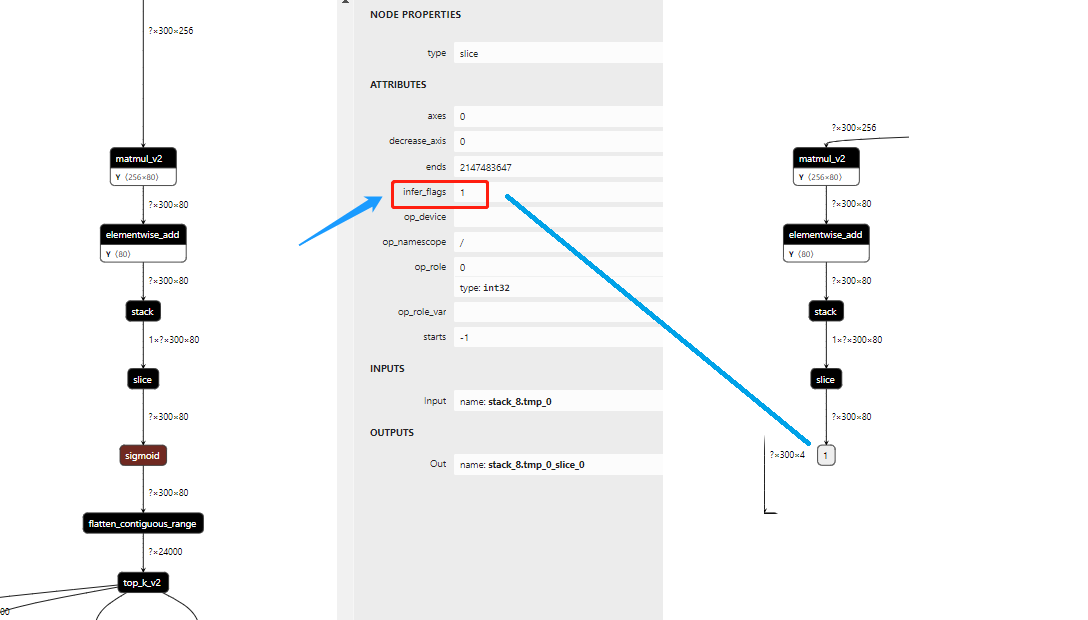 左边为未摘除后处理的pdmodel,右边为摘除后的pdmodel,以分类支路为例,我们可以看到,分类支路从Sigmoid开始,已经Sigmoid和后面的Children Node摘除干净,那么可以转化为onnx文件,步骤与上面一致。
 使用转化后的onnx文件进行推理:
import onnxruntime as rt
import cv2
import numpy as np

sess = rt.InferenceSession("rtdetr_hgnetv2_l_6x_coco_sim2.onnx")
img = cv2.imread("../000283.jpg")
img = cv2.resize(img, (640,640))
image = img.astype(np.float32) / 255.0
input_img = np.transpose(image, [2, 0, 1])
image = input_img[np.newaxis, :, :, :]
results = sess.run(['scores',  'boxes'], {'image': image})
scores, boxes = [o[0] for o in results]
index = scores.max(-1)
boxes, scores = boxes[index>0.5] * 640, scores[index>0.5]
labels = scores.argmax(-1)
scores = scores.max(-1)
for box, score, label in zip(boxes, scores, labels):
    cx, cy, w, h = int(box[0]), int(box[1]), int(box[2]), int(box[3])
    cv2.rectangle(img, (cx-int(w/2), cy-int(h/2)), (cx+int(w/2), cy+int(h/2)), (0, 255, 255), 2)
    cv2.putText(img, f'{label} : {score:.2f}', (cx-int(w/2), cy-int(h/2)-5), cv2.FONT_HERSHEY_SIMPLEX, 0.5, (0, 255, 255), 1)
cv2.imwrite('../result.jpg', img)
 【结尾】 本文介绍了RT-DETR两种风格的onnx格式和推理方式,不管哪种风格,精度无任何差别,至于是使用哪款,纯凭个人爱好,下一期会出一篇CNN-liked代表YOLOv8和DETR-liked代表RT-DETR在C++部署上的性能差异,在本文结尾先附上本文使用的两个onnx模型。
链接:https://pan.baidu.com/s/1AkG3uvILNQhQXeE7z8rYQw ,提取码:pogg 链接:https://pan.baidu.com/s/193Yt99CspP8vZ6ynWOl-ag ,提取码:pogg
参考链接: https://github.com/PaddlePaddle/PaddleDetection/tree/develop/configs/rtdetr https://aistudio.baidu.com/aistudio/projectdetail/6000200?channelType=0&channel=0 https://zhuanlan.zhihu.com/p/622940435
本文总阅读量次