OpenAI-Triton MLIR 第三章 Triton-shared开箱
OpenAI/Triton MLIR 第三章: Triton-shared开箱
本文首发于GiantPandaCV,未经作者允许不得转载
经过前面几章关于triton在nv gpu上调优的讲解,我们这章开始来看看triton的一个third_party库,该库是为了让triton去支持更多其他的backend。该项目的地址如下所示,并且已经在triton的main分支中,作为third_party进行了官方支持,在clone triton的时候,只需要带上recursive的flag就可以完成对triton-shared的使用。
什么是triton-shared?
关于triton-shared的官方具体实现,如下github repo所示:
GitHub - microsoft/triton-shared: Shared Middle-Layer for Triton Compilationgithub.com/microsoft/triton-shared
如下所示为官方对triton-shared的解释:
A shared middle-layer for the Triton Compiler.

Currently the middle layer is not complete but has enough functionality to demonstrate how it can work. The general idea is that Triton IR is lowered into an MLIR core dialect to allow it to be both shared across Triton targets as well as allow back-ends to be shared with other languages.

The basic intended architecture looks like this:

[Triton IR] -> [Middle Layer] -> [HW specific IR]

The middle-layer uses MLIR's Linalg and Tenor Dialects for operations on Triton block values. Operations on Triton pointers use the Memref Dialect.
triton-shared其实就是为了提供一个胶水一样的中间层,通过对middle-layer的设计来方便我们的编程语言或者编译器对接到下游不同的硬件生态,因为triton自身已经把nv和amd这两个比较常见的GPU后端实现了,如果第三方的厂商想通过复用triton的前端来对自己的芯片搞一套编译flow,那么triton-shared就起到了决定性的作用。下面这个图是triton的codebase所希望支持的一个愿景,可以看出来,中间这条垂直下来的分支就是triton所支持的nv gpu的优化路线,当用户写完的triton dsl会被翻译成python的AST,然后再从AST到对应的triton dialect,从这一步开始,也就正式将用户手写的成分转到了MLIR这套生态,然后再从triton dialect进一步优化到triton gpu dialect,从trition gpu dialect开始,就走了比较标准的LLVM代码生成,从LLVM IR一路lower到PTX,再到SASS,最终可以成功运行在NV的GPU上,这套codegen的路线相比TVM等其他编译框架来说更加的激进,直接越过了nvcc compiler,从而使得整个过程都变成了透明的,对于性能优化来说带来了更多的可能。
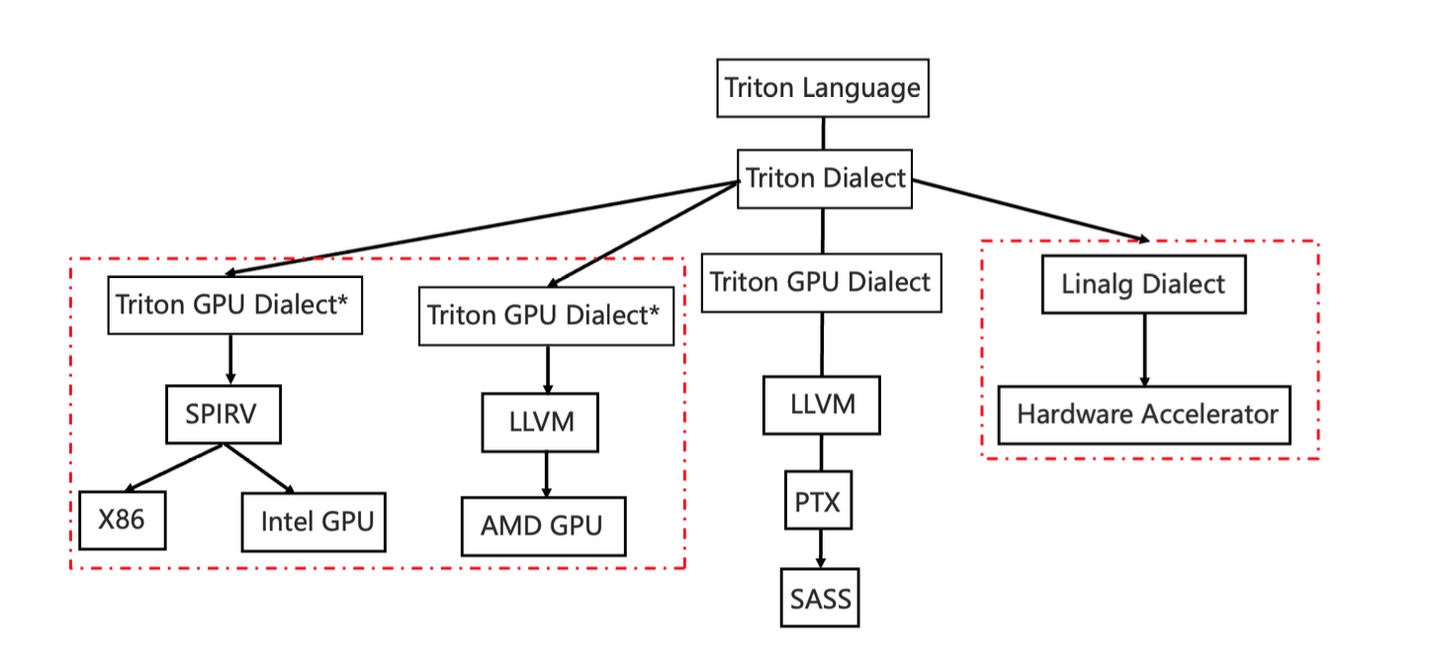
添加图片注释,不超过 140 字(可选)
triton-shared其实主要是用来cover最右边的分支,因为熟悉MLIR的朋友都知道,在右边的分支中,Linalg dialect是一个非常重要dialect,该dialect可以去承接很多不同的backend,在主流一些backend的编译优化环节,都会将Linalg作为主要的dialect来进行上下游不同dialect之间的转换与对接。
Triton-shared的安装
Triton-shared的安装其实也很简单,只需要一开始通过recursive来clone整个triton的主分支,然后使用
export TRITON_CODEGEN_TRITON_SHARED=1
来指明,我们在build triton整个项目的过程中需要使用到triton-shared这个第三方的库。接下来的流程按照triton官方repo的readme一步一步进行即可,有关LLVM我是使用的具体commit id下手动编译得到的llvm
LLVM commit id: b1115f8ccefb380824a9d997622cc84fc0d84a89
Triton commit id: 1c2d2405bf04dca2de140bccd65480c3d02d995e
为什么要选择如上两个固定的commit id,其实理由很简单,因为我前面做过一些关于triton和llvm的开发都是基于上面两个id做的,所以后面我的所有教程以及案例展示都是以这两个commit id为主进行。如果不知道怎么从0开始编译triton,可以参考我之前的教程:
科研败犬丶:OpenAI/Triton MLIR 第零章: 源码编译70 赞同 · 7 评论文章
Triton-shared的使用
讲解完了什么是triton-shared,以及triton-shared怎么安装,接下来,我们就来谈谈如何使用已经被编译好的triton-shared。当你按照我的上述流程编译好triton后,会在该路径下:
/triton/build/tools/triton-shared-opt
看到一个triton-shared-opt的可执行文件,熟悉MLIR的同学可能很快发现该方法其实就是MLIR中最基本的opt,该二进制文件可以完成从一个dialect向另外一个dialect的lowering,那么我们使用--help来看看triton-shared-opt的所有功能。如果能在终端中输出如下所示的信息,说明你的triton-shared已经全部安装完毕了。
OVERVIEW: Triton-Shared test driver

Available Dialects: arith, builtin, cf, gpu, math, scf, triton_gpu, tt
USAGE: triton-shared-opt [options] <input file>

OPTIONS:

Color Options:

  --color                                                    - Use colors in output (default=autodetect)

General options:

  --abort-on-max-devirt-iterations-reached                   - Abort when the max iterations for devirtualization CGSCC repeat pass is reached
  --allow-unregistered-dialect                               - Allow operation with no registered dialects
  Compiler passes to run
    Passes:
      --affine-data-copy-generate                            -   Generate explicit copying for affine memory operations
        --fast-mem-capacity=<ulong>                          - Set fast memory space capacity in KiB (default: unlimited)
        --fast-mem-space=<uint>                              - Fast memory space identifier for copy generation (default: 1)
        --generate-dma                                       - Generate DMA instead of point-wise copy
        --min-dma-transfer=<int>                             - Minimum DMA transfer size supported by the target in bytes
        --skip-non-unit-stride-loops                         - Testing purposes: avoid non-unit stride loop choice depths for copy placement
        --slow-mem-space=<uint>                              - Slow memory space identifier for copy generation (default: 0)
        --tag-mem-space=<uint>                               - Tag memory space identifier for copy generation (default: 0)
      --affine-expand-index-ops                              -   Lower affine operations operating on indices into more fundamental operations
      --affine-loop-coalescing                               -   Coalesce nested loops with independent bounds into a single loop
      --affine-loop-fusion                                   -   Fuse affine loop nests
...
这里先来展示
--triton-to-linalg - Convert Triton to Linalg dialect
这个pass的使用,因为triton-shared主要就是用来做该优化的。他表示的就是将triton dialect作为输入,然后经过triton-to-linalg这个pass,将其lowering到具有相同语义的linalg dialect上,那triton dialect从哪里来得到呢?不要慌,triton-shared的repo为我们提供了很多MLIR格式的文件来方便我们使用该功能,具体路径如下:
/triton/third_party/triton_shared/test/Conversion/TritonToLinalg/*
在该教程中,我们使用dot.mlir作为案例进行分析,具体代码如下所示:
// RUN: triton-shared-opt --triton-to-linalg %s | FileCheck %s
module {
  tt.func @kernel(
    %arg0 : !tt.ptr<bf16>,
    %arg1 : !tt.ptr<bf16>,
    %arg2 : !tt.ptr<bf16>
  )
  {
    %0 = tt.make_range {end = 128 : i32, start = 0 : i32} : tensor<128xi32>
    %c64 = arith.constant 128 : i32
    %1 = tt.splat %c64 : (i32) -> tensor<128xi32>
    %2 = arith.muli %0, %1 : tensor<128xi32>
    %3 = tt.expand_dims %2 {axis = 1 : i32} : (tensor<128xi32>) -> tensor<128x1xi32>
    %4 = tt.broadcast %3 : (tensor<128x1xi32>) -> tensor<128x64xi32>
    %5 = tt.make_range {end = 64 : i32, start = 0 : i32} : tensor<64xi32>
    %6 = tt.expand_dims %5 {axis = 0 : i32} : (tensor<64xi32>) -> tensor<1x64xi32>
    %7 = tt.broadcast %6 : (tensor<1x64xi32>) -> tensor<128x64xi32>
    %8 = arith.addi %4, %7 : tensor<128x64xi32>
    %10 = tt.make_range {end = 256 : i32, start = 0 : i32} : tensor<256xi32>
    %11 = tt.expand_dims %10 {axis = 1 : i32} : (tensor<256xi32>) -> tensor<256x1xi32>
    %12 = tt.broadcast %11 : (tensor<256x1xi32>) -> tensor<256x64xi32>
    %13 = tt.make_range {end = 64 : i32, start = 0 : i32} : tensor<64xi32>
    %c256 = arith.constant 256 : i32
    %14 = tt.splat %c256 : (i32) -> tensor<64xi32>
    %15 = arith.muli %13, %14 : tensor<64xi32>
    %16 = tt.expand_dims %15 {axis = 0 : i32} : (tensor<64xi32>) -> tensor<1x64xi32>
    %17 = tt.broadcast %16 : (tensor<1x64xi32>) -> tensor<256x64xi32>
    %18 = arith.addi %12, %17 : tensor<256x64xi32>
    %20 = tt.splat %c256 : (i32) -> tensor<128xi32>
    %21 = arith.muli %0, %20 : tensor<128xi32>
    %22 = tt.expand_dims %21 {axis = 1 : i32} : (tensor<128xi32>) -> tensor<128x1xi32>
    %23 = tt.broadcast %22 : (tensor<128x1xi32>) -> tensor<128x256xi32>
    %24 = tt.expand_dims %10 {axis = 0 : i32} : (tensor<256xi32>) -> tensor<1x256xi32>
    %25 = tt.broadcast %24 {axis = 0 : i32} : (tensor<1x256xi32>) -> tensor<128x256xi32>
    %26 = arith.addi %23, %25 : tensor<128x256xi32>
    %30 = tt.splat %arg0 : (!tt.ptr<bf16>) -> tensor<128x64x!tt.ptr<bf16>>
    %31 = tt.addptr %30, %8 : tensor<128x64x!tt.ptr<bf16>>, tensor<128x64xi32>
    %32 = tt.load %31 {cache = 1 : i32, evict = 1 : i32, isVolatile = false}: tensor<128x64xbf16>
    %40 = tt.splat %arg1 : (!tt.ptr<bf16>) -> tensor<256x64x!tt.ptr<bf16>>
    %41 = tt.addptr %40, %18 : tensor<256x64x!tt.ptr<bf16>>, tensor<256x64xi32>
    %42 = tt.load %41 {cache = 1 : i32, evict = 1 : i32, isVolatile = false}: tensor<256x64xbf16>
    %43 = tt.trans %42 : (tensor<256x64xbf16>) -> tensor<64x256xbf16>
    %50 = tt.splat %arg2 : (!tt.ptr<bf16>) -> tensor<128x256x!tt.ptr<bf16>>
    %51 = tt.addptr %50, %26 : tensor<128x256x!tt.ptr<bf16>>, tensor<128x256xi32>
    %52 = tt.load %51 {cache = 1 : i32, evict = 1 : i32, isVolatile = false}: tensor<128x256xbf16>
    %60 = tt.dot %32, %43, %52 {allowTF32 = false, maxNumImpreciseAcc = 0 : i32} : tensor<128x64xbf16> * tensor<64x256xbf16> -> tensor<128x256xbf16>
    tt.store %51, %60 : tensor<128x256xbf16>
    tt.return
  }
}
上述MLIR其实很容易看懂,在%0->%10其实都是triton dialect的内容,该内容表示的就是从上层的triton dsl通过lower转换到对应的triton dialect的过程。其中tt就是表示的该MLIR所处的dialect是triton dialect,然后tt.xxx则表示了该dialect所支持的所有operation,有关如何定义一个MLIR dialect,我准备拿一个单独的教程来讲。
接下来,只需要在终端中输入
./triton-shared-opt --triton-to-linalg /triton/third_party/triton_shared/test/Conversion/TritonToLinalg/dot.mlir
就可以得到从triton dialect转到linag dialect部分对应的内容
#map = affine_map<(d0, d1) -> (d0, d1)>
module {
  func.func @kernel(%arg0: memref<*xbf16>, %arg1: memref<*xbf16>, %arg2: memref<*xbf16>, %arg3: i32, %arg4: i32, %arg5: i32, %arg6: i32, %arg7: i32, %arg8: i32) {
    %c256 = arith.constant 256 : index
    %c128 = arith.constant 128 : index
    %reinterpret_cast = memref.reinterpret_cast %arg0 to offset: [0], sizes: [128, 64], strides: [%c128, 1] : memref<*xbf16> to memref<128x64xbf16, strided<[?, 1]>>
    %alloc = memref.alloc() : memref<128x64xbf16>
    memref.copy %reinterpret_cast, %alloc : memref<128x64xbf16, strided<[?, 1]>> to memref<128x64xbf16>
    %0 = bufferization.to_tensor %alloc restrict writable : memref<128x64xbf16>
    %reinterpret_cast_0 = memref.reinterpret_cast %arg1 to offset: [0], sizes: [256, 64], strides: [1, %c256] : memref<*xbf16> to memref<256x64xbf16, strided<[1, ?]>>
    %alloc_1 = memref.alloc() : memref<256x64xbf16>
    memref.copy %reinterpret_cast_0, %alloc_1 : memref<256x64xbf16, strided<[1, ?]>> to memref<256x64xbf16>
    %1 = bufferization.to_tensor %alloc_1 restrict writable : memref<256x64xbf16>
    %2 = tensor.empty() : tensor<64x256xbf16>
    %transposed = linalg.transpose ins(%1 : tensor<256x64xbf16>) outs(%2 : tensor<64x256xbf16>) permutation = [1, 0]
    %reinterpret_cast_2 = memref.reinterpret_cast %arg2 to offset: [0], sizes: [128, 256], strides: [%c256, 1] : memref<*xbf16> to memref<128x256xbf16, strided<[?, 1]>>
    %alloc_3 = memref.alloc() : memref<128x256xbf16>
    memref.copy %reinterpret_cast_2, %alloc_3 : memref<128x256xbf16, strided<[?, 1]>> to memref<128x256xbf16>
    %3 = bufferization.to_tensor %alloc_3 restrict writable : memref<128x256xbf16>
    %4 = tensor.empty() : tensor<128x256xbf16>
    %5 = linalg.matmul ins(%0, %transposed : tensor<128x64xbf16>, tensor<64x256xbf16>) outs(%4 : tensor<128x256xbf16>) -> tensor<128x256xbf16>
    %6 = linalg.generic {indexing_maps = [#map, #map, #map], iterator_types = ["parallel", "parallel"]} ins(%5, %3 : tensor<128x256xbf16>, tensor<128x256xbf16>) outs(%5 : tensor<128x256xbf16>) {
    ^bb0(%in: bf16, %in_4: bf16, %out: bf16):
      %7 = arith.addf %in, %in_4 : bf16
      linalg.yield %7 : bf16
    } -> tensor<128x256xbf16>
    memref.tensor_store %6, %reinterpret_cast_2 : memref<128x256xbf16, strided<[?, 1]>>
    return
  }
}
关于其他更加具体的operator,我们可以都按照上述流程来进行操作,一旦你的编译框架是基于MLIR来开发的,那么如果能很好的转到Linalg,那么就说明了后续在接入自己的backend以及适配一些ISA的过程就会方便不少,这也从另外一个角度彰显了为什么现在的趋势都是将自己的compiler通过MLIR进行重构。最重要的原因,其实就是以最小的开发成本方便的接入各种软件或者硬件的生态。
后记
对triton的研究已经有一段时间了,由于当时学triton也是基于源码一步一步硬吃过来的,并且triton也没有比较好的中文教程,所以后面会利用空闲时间将我目前对于使用triton来做codegen的各种优化方法(不同backend以及不同IR层面的pass)和细节(底层layout的设计)进行一个详细的梳理,来帮助更多想要使用triton来做codegen的同学。
本文总阅读量次