医学图像的 AI 框架 MONAI 详细教程(一)
目录
- 前言
- 安装步骤
- 基于 MONAI 的 MedMNIST 数据集分类任务
- 导入依赖
- 下载数据
- 读取图像信息
- MONAI transforms
- 定义 Dataset、网络和优化器
- 训练
- 测试
- 总结
- 参考链接
前言
最近在读 CVPR 2023 上和医学图像方向相关的论文,发现其中的 Label-Free Liver Tumor Segmentation 这篇论文使用了 MONAI 这个框架。之前关注过的一些医学图像的期刊论文上,也有 MONAI 的出现,加之前的导师有过推荐,所以了解学习了下。简单检索后,发现网上关于 MONAI 的中文教程还没有,后面会有一系列的很详细的关于 MONAI 的教程,都会在 GiantPandaCV 上发布。
MONAI 主要有三个主要的仓库,MONAI Core、MONAI Label 和 MONAI Deploy(SDK),分别用在模型训练、医学图像打标签和模型部署上,后面我们会一一介绍。地址分别如下:
- https://github.com/Project-MONAI/MONAI
- https://github.com/Project-MONAI/MONAILabel
- https://docs.monai.io/projects/monai-deploy-app-sdk/en/stable/index.html
关于基于 torch 的 MONAI Core,也就是我们第一部分重点介绍的内容,主要有以下优点:
- 灵活的多维医学图像数据预处理功能;
- 可组合和可移植的 API,可轻松集成;
- 网络模型、损失函数、评估指标等的特定领域(不同医学图像相关任务)实现;
- GPUs 数据并行支持。
安装步骤
我这里推荐在 conda 环境中安装,因为 MONAI 通常是配合其他第三方库一起使用的,比如最重要的 torch 和其他的 niBabel、skimage、pillow 等。
下载 conda,在清华镜像站的网址,推荐下面的版本:
wget https://mirrors.tuna.tsinghua.edu.cn/anaconda/archive/Anaconda3-2020.07-Linux-x86_64.sh
安装 conda:
bash Anaconda3-2020.07-Linux-x86_64.sh
在创建好的 conda 环境下安装 MONAI:
pip3 install monai
这一步可能会出现 timed out,也可以使用豆瓣的 pip,还会自动安装一个 1.13.1 版本的 torch、cuda_runtime 和 cudnn 等。
pip3 install -i https://pypi.doubanio.com/simple/ monai
测试,下面的警告可以忽略掉:
>>> import monai
/data/home/lixiang/anaconda3/lib/python3.8/site-packages/pandas/_testing.py:24: FutureWarning: In the future `np.bool` will be defined as the corresponding NumPy scalar.
  import pandas._libs.testing as _testing
基于 MONAI 的 MedMNIST 数据集分类任务
首先介绍下 MedMNIST 数据集,本数据集是由上海交通大学的倪冰冰团队提供,现在已经扩展到 MedMNIST v2。是一个类似于 MNIST 的大规模标准化生物医学图像集合,包括 12 个 2D 数据集和 6 个 3D 数据集。所有图像都被预处理为 28 x 28 (2D) 或 28 x 28 x 28 (3D) 的分辨率并带有相应的分类标签,MedMNIST v1 也可能有 64 x 64 的数据。
导入依赖
import os
import shutil
import tempfile
import matplotlib.pyplot as plt
import PIL
import torch
import numpy as np
from sklearn.metrics import classification_report
from monai.apps import download_and_extract
from monai.config import print_config
from monai.data import decollate_batch, DataLoader
from monai.metrics import ROCAUCMetric
from monai.networks.nets import DenseNet121
from monai.transforms import (
Activations,
EnsureChannelFirst,
AsDiscrete,
Compose,
LoadImage,
RandFlip,
RandRotate,
RandZoom,
ScaleIntensity,
)
from monai.utils import set_determinism
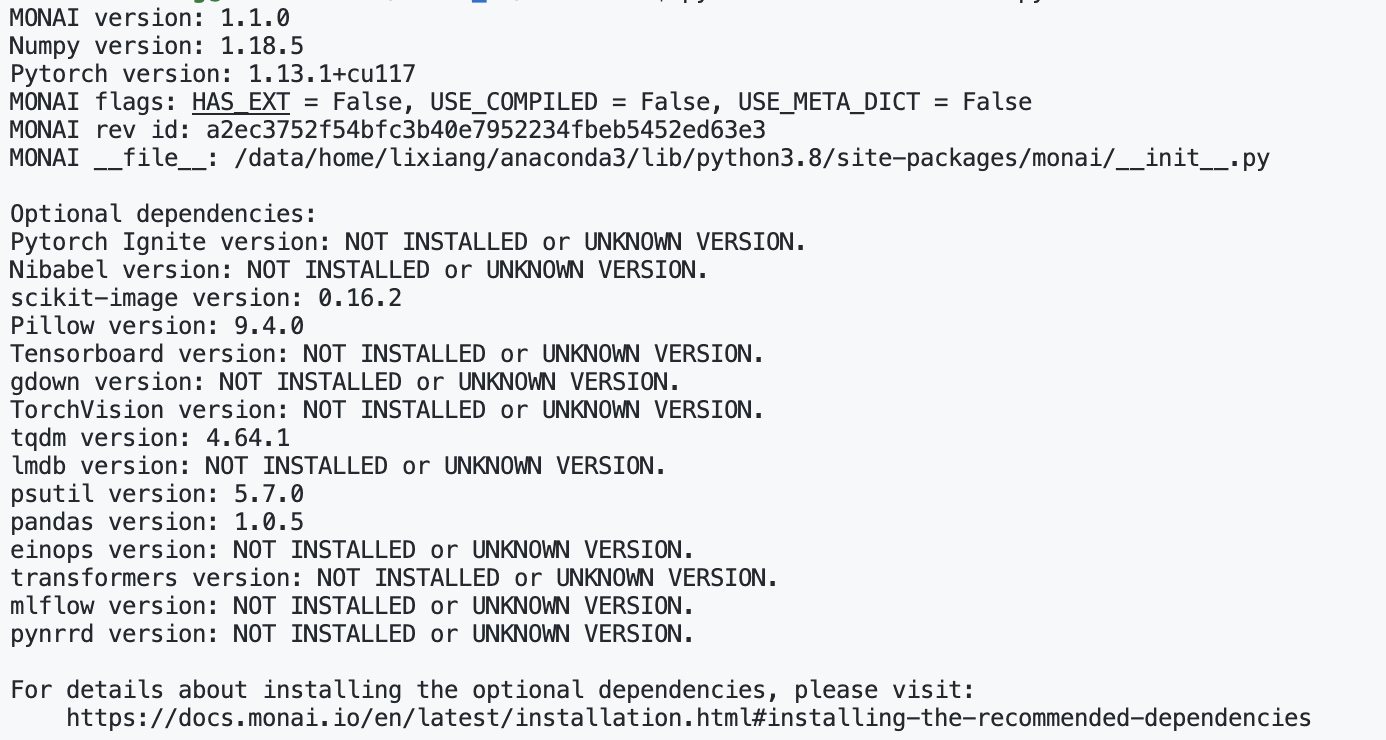
print_config()
其中 print_config() 可以查看当前 MONAI 需要的和未安装的第三方库版本信息。
下载数据
root_dir = "../MONAI_DATA_DIRECTORY"
print(root_dir)

resource = "https://github.com/Project-MONAI/MONAI-extra-test-data/releases/download/0.8.1/MedNIST.tar.gz"
md5 = "0bc7306e7427e00ad1c5526a6677552d"

compressed_file = os.path.join(root_dir, "MedNIST.tar.gz")
data_dir = os.path.join(root_dir, "MedNIST")
if not os.path.exists(data_dir):
    download_and_extract(resource, compressed_file, root_dir, md5)
这一步国内需要代理,不然数据集下载的很慢,可以去官网下载,上传到 MONAI_DATA_DIRECTORY 目录中。
设置随即种子:
set_determinism(seed=0)
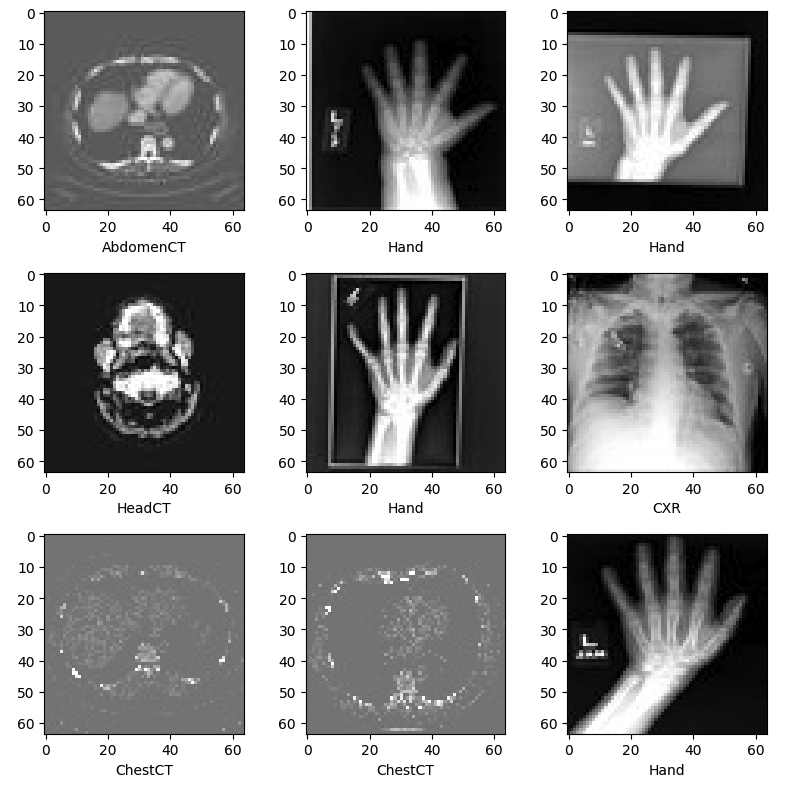
下载之后可以发现,MedNIST 目录中共有6个文件夹:Hand,AbdomenCT,CXR,ChestCT,BreastMRI,HeadCT,也就是我们六分类的标签。
读取图像信息
获取图像数量,维度,六个分类和每个分类下的图像数量信息。
class_names = sorted(x for x in os.listdir(data_dir) if os.path.isdir(os.path.join(data_dir, x)))
num_class = len(class_names)
image_files = [
    [os.path.join(data_dir, class_names[i], x) for x in os.listdir(os.path.join(data_dir, class_names[i]))]
    for i in range(num_class)
]
num_each = [len(image_files[i]) for i in range(num_class)]
image_files_list = []
image_class = []
for i in range(num_class):
    image_files_list.extend(image_files[i])
    image_class.extend([i] * num_each[i])
num_total = len(image_class)
image_width, image_height = PIL.Image.open(image_files_list[0]).size

print(f"Total image count: {num_total}")
print(f"Image dimensions: {image_width} x {image_height}")
print(f"Label names: {class_names}")
print(f"Label counts: {num_each}")
输出:

我们这里随机选择数据集的 10% 作为验证,将 10% 作为测试。
val_frac = 0.1
test_frac = 0.1
length = len(image_files_list)
indices = np.arange(length)
np.random.shuffle(indices)

test_split = int(test_frac * length)
val_split = int(val_frac * length) + test_split
test_indices = indices[:test_split]
val_indices = indices[test_split:val_split]
train_indices = indices[val_split:]

train_x = [image_files_list[i] for i in train_indices]
train_y = [image_class[i] for i in train_indices]
val_x = [image_files_list[i] for i in val_indices]
val_y = [image_class[i] for i in val_indices]
test_x = [image_files_list[i] for i in test_indices]
test_y = [image_class[i] for i in test_indices]

print(f"Training count: {len(train_x)}, Validation count: " f"{len(val_x)}, Test count: {len(test_x)}")
终端输出为:Training count: 47164, Validation count: 5895, Test count: 5895
MONAI transforms
如下图所示,在 MONAI 中,transforms 大致可以分为以下几个类别。

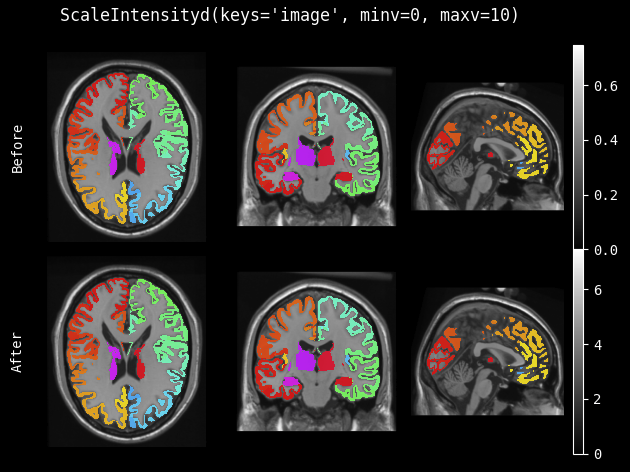
接下来定义训练和验证的 transforms 代码如下。EnsureChannelFirst 调整或增加输入数据的通道维度,保证 CNHW;ScaleIntensity 将输入图像的强度缩放到给定的值范围,默认 0 到 1,有点类似于伽马变换的作用; RandRotate 随机旋转;RandFlip 沿轴随机翻转图像;RandZoom 即随机缩放。
train_transforms = Compose(
    [
        LoadImage(image_only=True),
        EnsureChannelFirst(),
        ScaleIntensity(),
        RandRotate(range_x=np.pi / 12, prob=0.5, keep_size=True),
        RandFlip(spatial_axis=0, prob=0.5),
        RandZoom(min_zoom=0.9, max_zoom=1.1, prob=0.5),
    ]
)

val_transforms = Compose([LoadImage(image_only=True), EnsureChannelFirst(), ScaleIntensity()])

y_pred_trans = Compose([Activations(softmax=True)])
y_trans = Compose([AsDiscrete(to_onehot=num_class)])
ScaleIntensity 的效果如下:
定义 Dataset、网络和优化器
这部分和 torch 是保持一致的,就不过多解释了。
class MedNISTDataset(torch.utils.data.Dataset):
    def __init__(self, image_files, labels, transforms):
        self.image_files = image_files
        self.labels = labels
        self.transforms = transforms

    def __len__(self):
        return len(self.image_files)

    def __getitem__(self, index):
        return self.transforms(self.image_files[index]), self.labels[index]


train_ds = MedNISTDataset(train_x, train_y, train_transforms)
train_loader = DataLoader(train_ds, batch_size=300, shuffle=True, num_workers=10)

val_ds = MedNISTDataset(val_x, val_y, val_transforms)
val_loader = DataLoader(val_ds, batch_size=300, num_workers=10)

test_ds = MedNISTDataset(test_x, test_y, val_transforms)
test_loader = DataLoader(test_ds, batch_size=300, num_workers=10)
device = torch.device("cuda" if torch.cuda.is_available() else "cpu")
model = DenseNet121(spatial_dims=2, in_channels=1, out_channels=num_class).to(device)
loss_function = torch.nn.CrossEntropyLoss()
optimizer = torch.optim.Adam(model.parameters(), 1e-5)
max_epochs = 4
val_interval = 1
auc_metric = ROCAUCMetric()
训练
这一部分执行一个典型的 torch 训练,大致步骤为:1.初始化变量 best_metric 和 best_metric_epoch 为 -1,记录最优。2.使用一个 for 循环来迭代 max_epochs 次训练。在每个 epoch 开始时,将打印出一条消息,显示当前 epoch 和总 epoch 数。3.将模型设置为训练模式,以确保在训练时进行批处理规范化等操作。4.遍历 train_loader 中的所有批次。5.计算每个 epoch 的平均损失,并将其添加到 epoch_loss_values 列表中。6.如果 (epoch + 1) 是 val_interval 的倍数,则进行验证,并设置为 eval 模式。7.在训练结束时,记录最优结果所在的 epoch。
best_metric = -1
best_metric_epoch = -1
epoch_loss_values = []
metric_values = []
for epoch in range(max_epochs):
print("-" * 10)
print(f"epoch {epoch + 1}/{max_epochs}")
model.train()
epoch_loss = 0
step = 0
for batch_data in train_loader:
step += 1
inputs, labels = batch_data[0].to(device), batch_data[1].to(device)
optimizer.zero_grad()
outputs = model(inputs)
loss = loss_function(outputs, labels)
loss.backward()
optimizer.step()
epoch_loss += loss.item()
print(f"{step}/{len(train_ds) // train_loader.batch_size}, " f"train_loss: {loss.item():.4f}")
epoch_len = len(train_ds) // train_loader.batch_size
epoch_loss /= step
epoch_loss_values.append(epoch_loss)
print(f"epoch {epoch + 1} average loss: {epoch_loss:.4f}")
if (epoch + 1) % val_interval == 0:
model.eval()
with torch.no_grad():
y_pred = torch.tensor([], dtype=torch.float32, device=device)
y = torch.tensor([], dtype=torch.long, device=device)
for val_data in val_loader:
val_images, val_labels = (
val_data[0].to(device),
val_data[1].to(device),
)
y_pred = torch.cat([y_pred, model(val_images)], dim=0)
y = torch.cat([y, val_labels], dim=0)
y_onehot = [y_trans(i) for i in decollate_batch(y, detach=False)]
y_pred_act = [y_pred_trans(i) for i in decollate_batch(y_pred)]
auc_metric(y_pred_act, y_onehot)
result = auc_metric.aggregate()
auc_metric.reset()
del y_pred_act, y_onehot
metric_values.append(result)
acc_value = torch.eq(y_pred.argmax(dim=1), y)
acc_metric = acc_value.sum().item() / len(acc_value)
if result > best_metric:
best_metric = result
best_metric_epoch = epoch + 1
torch.save(model.state_dict(), os.path.join(root_dir, "best_metric_model.pth"))
print("saved new best metric model")
print(
f"current epoch: {epoch + 1} current AUC: {result:.4f}"
f" current accuracy: {acc_metric:.4f}"
f" best AUC: {best_metric:.4f}"
f" at epoch: {best_metric_epoch}"
)
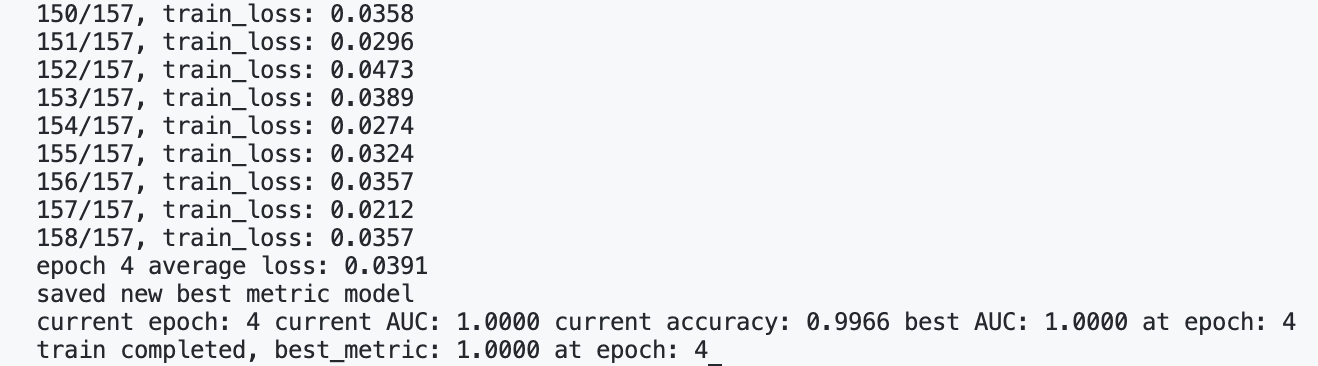
print(f"train completed, best_metric: {best_metric:.4f} " f"at epoch: {best_metric_epoch}")
输出:
测试
model.load_state_dict(torch.load(os.path.join(root_dir, "best_metric_model.pth")))
model.eval()
y_true = []
y_pred = []
with torch.no_grad():
for test_data in test_loader:
test_images, test_labels = (
test_data[0].to(device),
test_data[1].to(device),
)
pred = model(test_images).argmax(dim=1)
for i in range(len(pred)):
y_true.append(test_labels[i].item())
y_pred.append(pred[i].item())
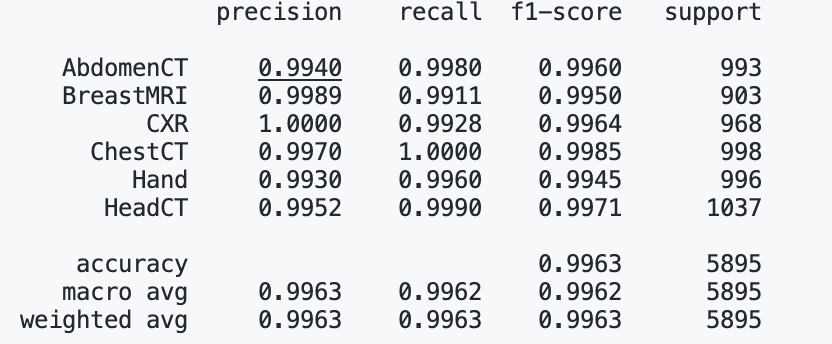
print(classification_report(y_true, y_pred, target_names=class_names, digits=4))
最后得到 PR,f1-score 值的结果如下:
总结
在第一篇教程中,我们完成了一个医学图像的分类任务,可以使用 MONAI 而非 torch 等框架的原因在于,MONAI 针对医学图像有特殊的 transforms,且有丰富的医学图像数据集和模型库。下一篇教程我们将介绍如何基于 MONAI 完成 3D 医学图像分类任务,并介绍一些有趣的 API。
教程源码在:https://github.com/lixiang007666/monai_lx/tree/main/tutorial1,后面会逐渐补充起来,欢迎 star~
参考链接
- https://docs.monai.io/en/stable/
- https://github.com/Project-MONAI
- https://blog.csdn.net/u014264373/article/details/113742194
本文总阅读量次